How to Backup Your Website: A Complete Guide
Do you manage a website and prioritize its security? A complete backup system is the most viable strategy. It secures your data and provides rapid site restoration if disruptions occur. In this article, we discuss the importance of website backups, guide you through the setup process, and suggest how often you should conduct backups to maintain data integrity. Adopt these measures to protect your website against potential data loss and improve security and recovery capabilities.
Why Is It Important to Back Up Your Website?
A backup refers to creating a copy of your website’s data that can be restored in case of a primary data failure or loss. This is important for websites as it guarantees that data can be quickly restored to a previous state, which maintains the site’s availability and functionality.
Before we wrote this article, we reviewed several studies that revealed striking findings. The Handy Recovery Advisor’s backup survey shows that while 78% of respondents back up their data, only 33% do so regularly. This lack of regular backups raises concerns as they are necessary for data management and recovery. Moreover, although the cloud is favored for storage due to its convenience, 50% of users fail to keep physical backups, which increases the risk of data loss during cloud outages or breaches. These statistics highlight the urgent need for website owners to improve their knowledge and implement strict backup practices
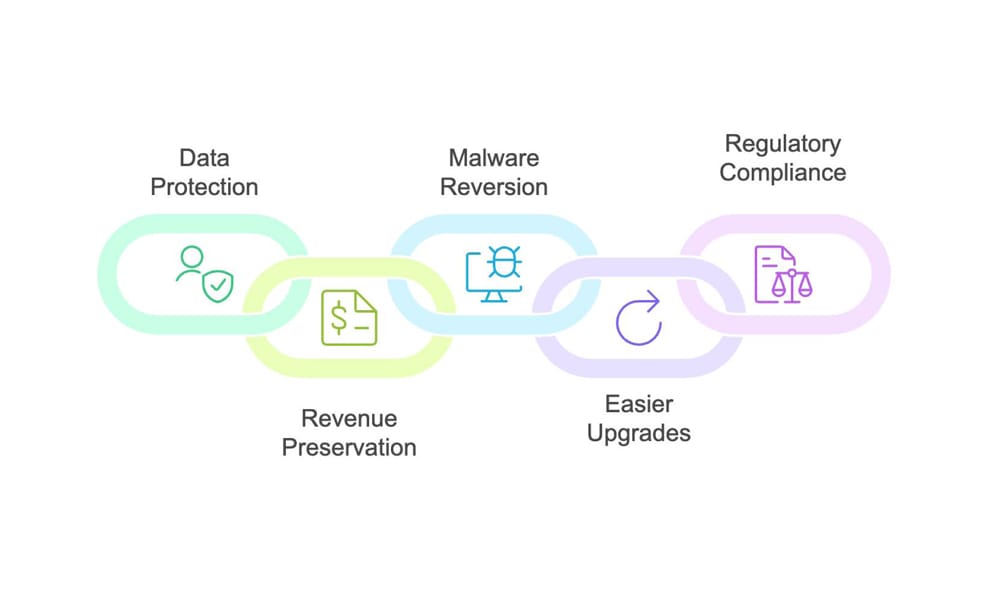
- Regular backups protect against data loss from cyber-attacks, server failures, and other problems. It takes much less time and costs less to restore a website from a backup than to attempt to recreate content from scratch.
- Downtime equals lost revenue for businesses. Up-to-date backups allow quick service restoration, reduce downtime, and maintain customer trust.
- Backup copies enable you to revert to a clean state, free from any malware or harmful code that might have infiltrated your site.
- When you upgrade or move to a new hosting provider, a recent backup makes the process easier and reduces the risk of data omission or corruption.
- Certain industries require data retention to comply with legal or regulatory standards. Regular backups guarantee you meet these requirements without additional effort.
How to Create a Backup of Your Website
Now that you understand the importance of regular website backups let’s look at how to implement them. You have two main options: manual backups, which you store on physical devices and must manage yourself each time, and automated backups, set up once to run at specified times and store data in the cloud. We will examine both methods. User feedback from forums indicates that many people use only one backup method, but we advise using both to improve your website’s security. This strengthens your data protection and provides several recovery points, which are critical for handling various data loss or corruption situations.
Note : By the way, if you have any questions about backups, the portal we mentioned earlier has a forum where people ask and discuss various topics of interest.
Method 1: Use the cPanel Backup Tool
First, let’s discuss how to manually back up your website with cPanel. cPanel is a widely used web hosting control panel with a graphical interface and automation tools that simplify website hosting. It is popular for its intuitive design and broad features, such as file management, email handling, and security. cPanel also provides data backup options that allow you to create, manage, and restore backups easily.
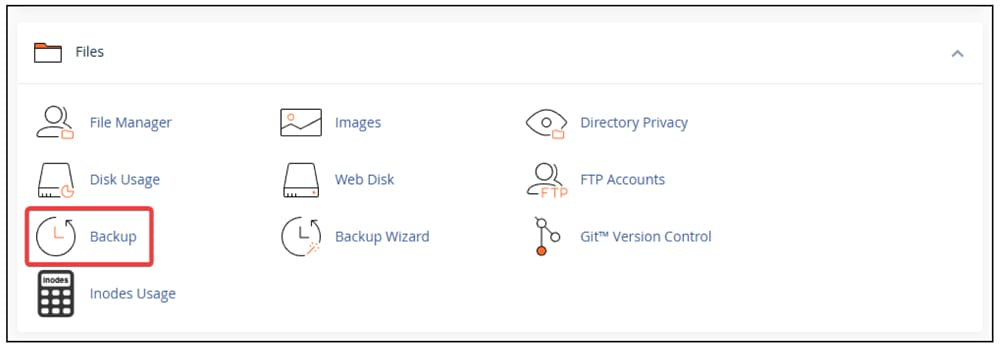
- Access your website’s cPanel control panel. You will typically find the login details provided by your hosting service.
- Once logged in, go to the “Files” section and click the “Backup” option. This area allows you to manage all backup-related activities.
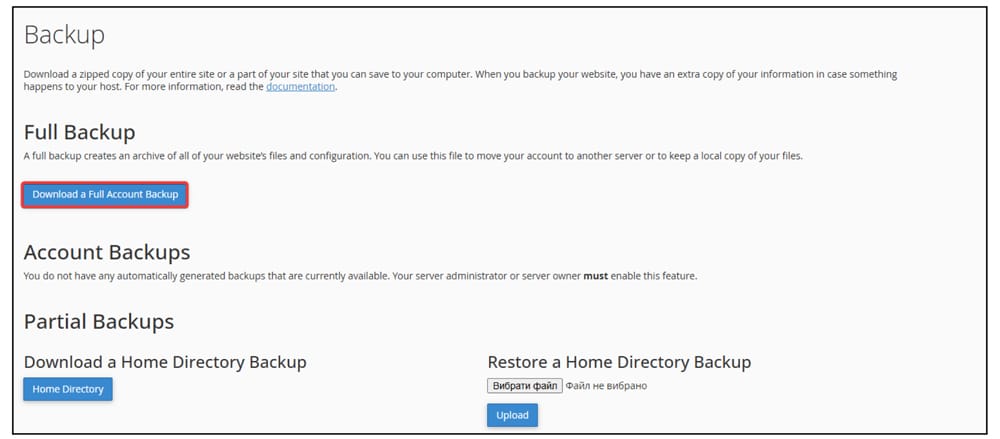
- Click on “Download a Full Website (or Account) Backup.” You can also perform partial backups, including only the home directory or specific SQL databases. This option reduces the time needed to download large data sets.
- Choose “Home Directory” as your backup destination. Then, enter your email address to receive notifications when the backup is complete.
- Click on “Generate Backup.” This process starts to create your website’s backup file.
- After generating the backup, click “Go Back.” You will see a link that displays “Backups Available for Download.” Use this link to download the backup archive file to your local computer.
- Once the download completes, copy the backup files to an external storage device such as a hard drive or USB flash drive for an additional layer of security.
Note: For WordPress-based websites, you need to back up the database. Navigate to the “Databases” section and click on “phpMyAdmin.” Select your website’s database and click “Export.” On the following page, click “Go” to download the SQL file.
Method 2: Utilize Third-party Backup Services
If you opt to automate your website backups, third-party backup tools are necessary. These services operate on a simple principle: once configured, they automatically handle the backup process at predefined intervals and store the data in the cloud. This automation reduces the time and effort required compared to manual backups and minimizes the risk of human error.
The primary advantage of third-party services over manual backups is their set-and-forget nature. Once you set up the service, it continually works in the background, providing your data is backed up without further intervention. Additionally, these tools often offer improved security measures, such as encryption and secure data centers, which provide better protection against data breaches and other security threats.
Several third-party backup services, such as CodeGuard, Acronis, and Druva, provide automated solutions to improve your website’s security and recovery capabilities. CodeGuard offers daily automatic backups and active monitoring for changes, which allow swift restoration. Acronis provides cyber protection with secure cloud backups, while Druva provides scalable cloud-based backups suitable for various IT environments.
Note: While we will not provide specific instructions for any one backup service, we will outline general steps that you can adapt to your chosen service.
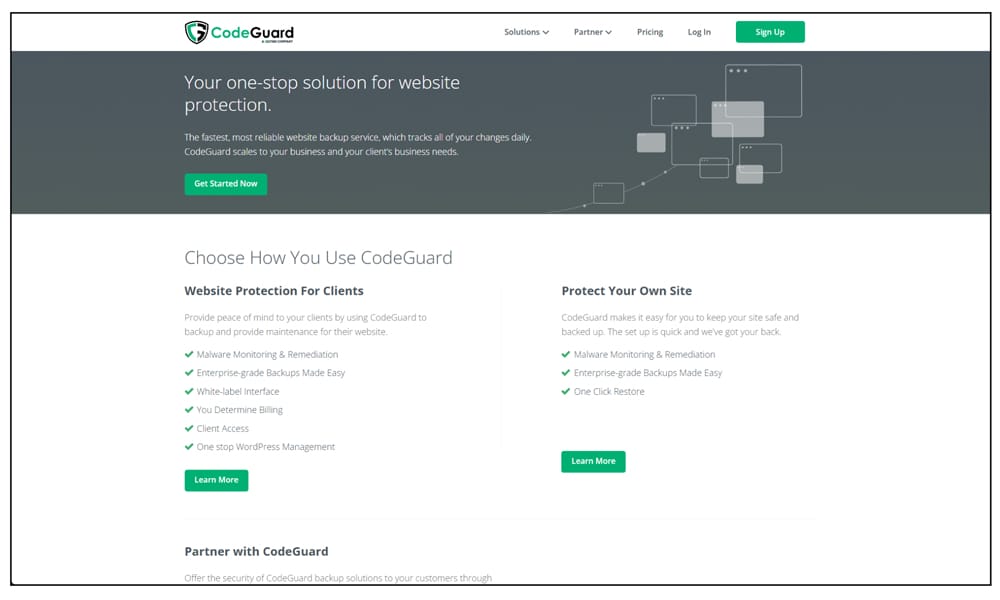
- Select a service that fits your needs based on the frequency of updates, storage requirements, and budget.
- Create an account with your chosen backup service and enter the necessary details about your website to set up the service.
- Decide how often the service should perform backups. Depending on how frequently your website’s content changes, you might choose daily, weekly, or real-time backups.
- Choose storage options. Most services offer various storage options, including cloud storage. Some services may also allow backups to be stored on local devices.
- Initiate the backup process. The service will handle the backups as configured and, if available, notify you of the backup status.
- Check the backup service dashboard regularly to verify that it operates correctly and updates as necessary for any changes to your site or its data requirements.
Method 3: Backup Your WordPress Site with a Plugin
If your website operates on WordPress, you can use specialized plugins for backups. Plugins are tools that integrate with WordPress to extend its functionality. In the context of backups, these plugins automate the process of saving your website’s data, including posts, pages, and settings.
Popular WordPress backup plugins include UpdraftPlus, which offers easy scheduling and multiple cloud storage options; BackupBuddy, which provides reliable scheduled backups and easy site migration tools; and VaultPress (Jetpack Backup), which is developed by Automattic and allows real-time backups and security scans. Each plugin provides powerful protection and easy recovery for WordPress sites.
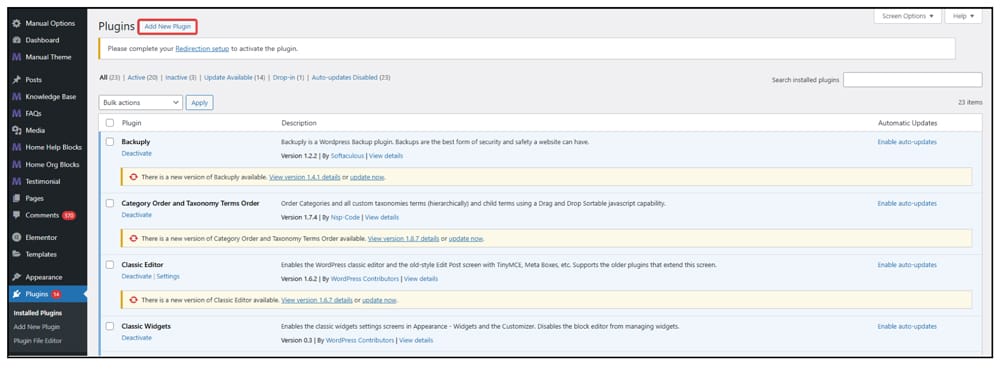
- Select a backup plugin that suits your needs.
- Go to ‘Plugins’ from your WordPress dashboard, click ‘Add New,’ and search for your chosen plugin. Install it and then click ‘Activate’.
- Navigate to the plugin settings in your WordPress dashboard. Set up backup schedules, choose what to back up (database, files, or both), and select your preferred storage location.
- Most plugins allow you to run an initial backup immediately. Click ‘Backup Now’ to start the process and confirm everything works correctly.
- Check the plugin’s logs and settings regularly to verify that backups are complete. Also, keep your plugin updated to take advantage of the latest features and security updates.
How Often Should You Backup Your Website Data?
Now that you know the various methods for backing up your website, an important part of your full backup strategy is to decide how frequently to create backups. The frequency largely depends on how often you update the information on your site.
- A monthly backup suffices if your website features static content that seldom changes, such as a corporate site with basic information about your company, services, and contact details. This guarantees you capture any minor updates or changes that occur less frequently.
- Sites with regular content updates, such as blog posts or news updates, should opt for weekly backups. This helps preserve the latest content additions without overloading your storage with daily backups.
- Daily backups are necessary for dynamic sites that experience daily changes, including e-commerce platforms with new product listings or sites with high user interaction and content modification.
- In addition to the regular backups described above, you should perform a backup before you implement changes to your website, such as a new theme installation or major software updates. For example, if you plan to update your content management system to a new version, a pre-update backup acts as a safety net, which allows you to restore the site to its previous state if the update fails.
- Similarly, after you successfully apply major updates or changes, conducting a backup captures your site in its newest form. It is important to maintain a current recovery point that reflects all recent improvements.
Final Thoughts
In summary, regular backups protect your website data against potential loss and enable swift recovery in case of disruptions. In this article, we have outlined various methods to back up your website, such as manual solutions through cPanel, automated services, and WordPress plugins, each integral to a thorough backup strategy.
We also recommend the 3-2-1 backup rule: Keep three copies of your data on two different media types, with one copy stored offsite. This protects multiple storage options and locations and prevents technological and physical risks. Furthermore, you must regularly test your backups’ restoration capabilities. This guarantees you can rely on them to restore your website when necessary and maintain its functionality and security. If you adopt these practices and advice, you will protect your website completely and preserve its integrity and continuity without interruption.
FAQ
What are the differences between manual and automated website backups, and which one is right for me?
Manual backups require you to initiate the process yourself at regular intervals. This method allows you to control what you back up and when, but it requires consistent effort and attention. Automated backups, on the other hand, run at set intervals without your intervention after initial setup. They reduce the risk of human error and guarantee that backups occur consistently. Automated backups are ideal if you cannot regularly dedicate time to perform manual backups, while manual backups may suit if you need specific, less frequent data preservation.
What are the best practices for storing website backup files securely?
To store website backup files securely, follow these practices:
- Use encrypted external hard drives or NAS devices. Provide physical security and keep these storage devices locked and environmentally stable to protect them from theft, damage, or disasters.
- Opt for reputable cloud services with strong encryption practices both during transmission and at rest. Enable two-factor authentication to access the cloud accounts, and choose providers that comply with regulatory standards like GDPR or HIPAA if necessary.
How do partial website backups work, and when might I use them instead of a full website backup?
Partial website backups involve backing up only specific parts of your website, such as the database or specific directories, rather than the entire site. They are helpful for dynamic sites where content updates frequently, but the structure remains constant. You might use them when changes occur only in some parts of your site to save time and storage space.
How do I restore my website from a backup?
To restore your website from a backup:
- Determine the type of backup available (full or partial) and the restoration tools provided by your hosting service or backup software.
- If you’re restoring manually, upload the backup files to your server via FTP or a file manager or use the restore function provided by your backup solution.
- Test the restored site to check that it functions correctly and that all data appears as expected.
What are the common mistakes to avoid when backing up a website?
Avoid these common mistakes when you backup a website:
- If you do not schedule regular backups, you can lose data. It is important to perform backups frequently to capture all recent changes and additions to the website.
- If you keep all backups in one place, such as locally or solely in the cloud, you increase risk. If the storage fails or becomes inaccessible, you could lose your backup data. Always have a variety of storage options.
- Simply perform backups; however, this action alone is not enough. You must periodically test them and attempt to restore your website in a safe environment to verify that the backups are effective and the data remains intact.
- Use backup tools or plugins that are compatible with the latest version of your website’s platform to avoid incomplete backups or failure to capture any data. Keep your tools updated.


